Scene
The Scene section is everything that is not the product: how it is lit, what is behind it, how the shopper moves the camera, and what they look at while the model loads.
It makes more difference than people expect. The same model can look like a catalogue photograph or like a grey lump depending on nothing but the lighting and background. In The surroundings one sky, one lighting look and one ground put the catamaran on the water at sunset.
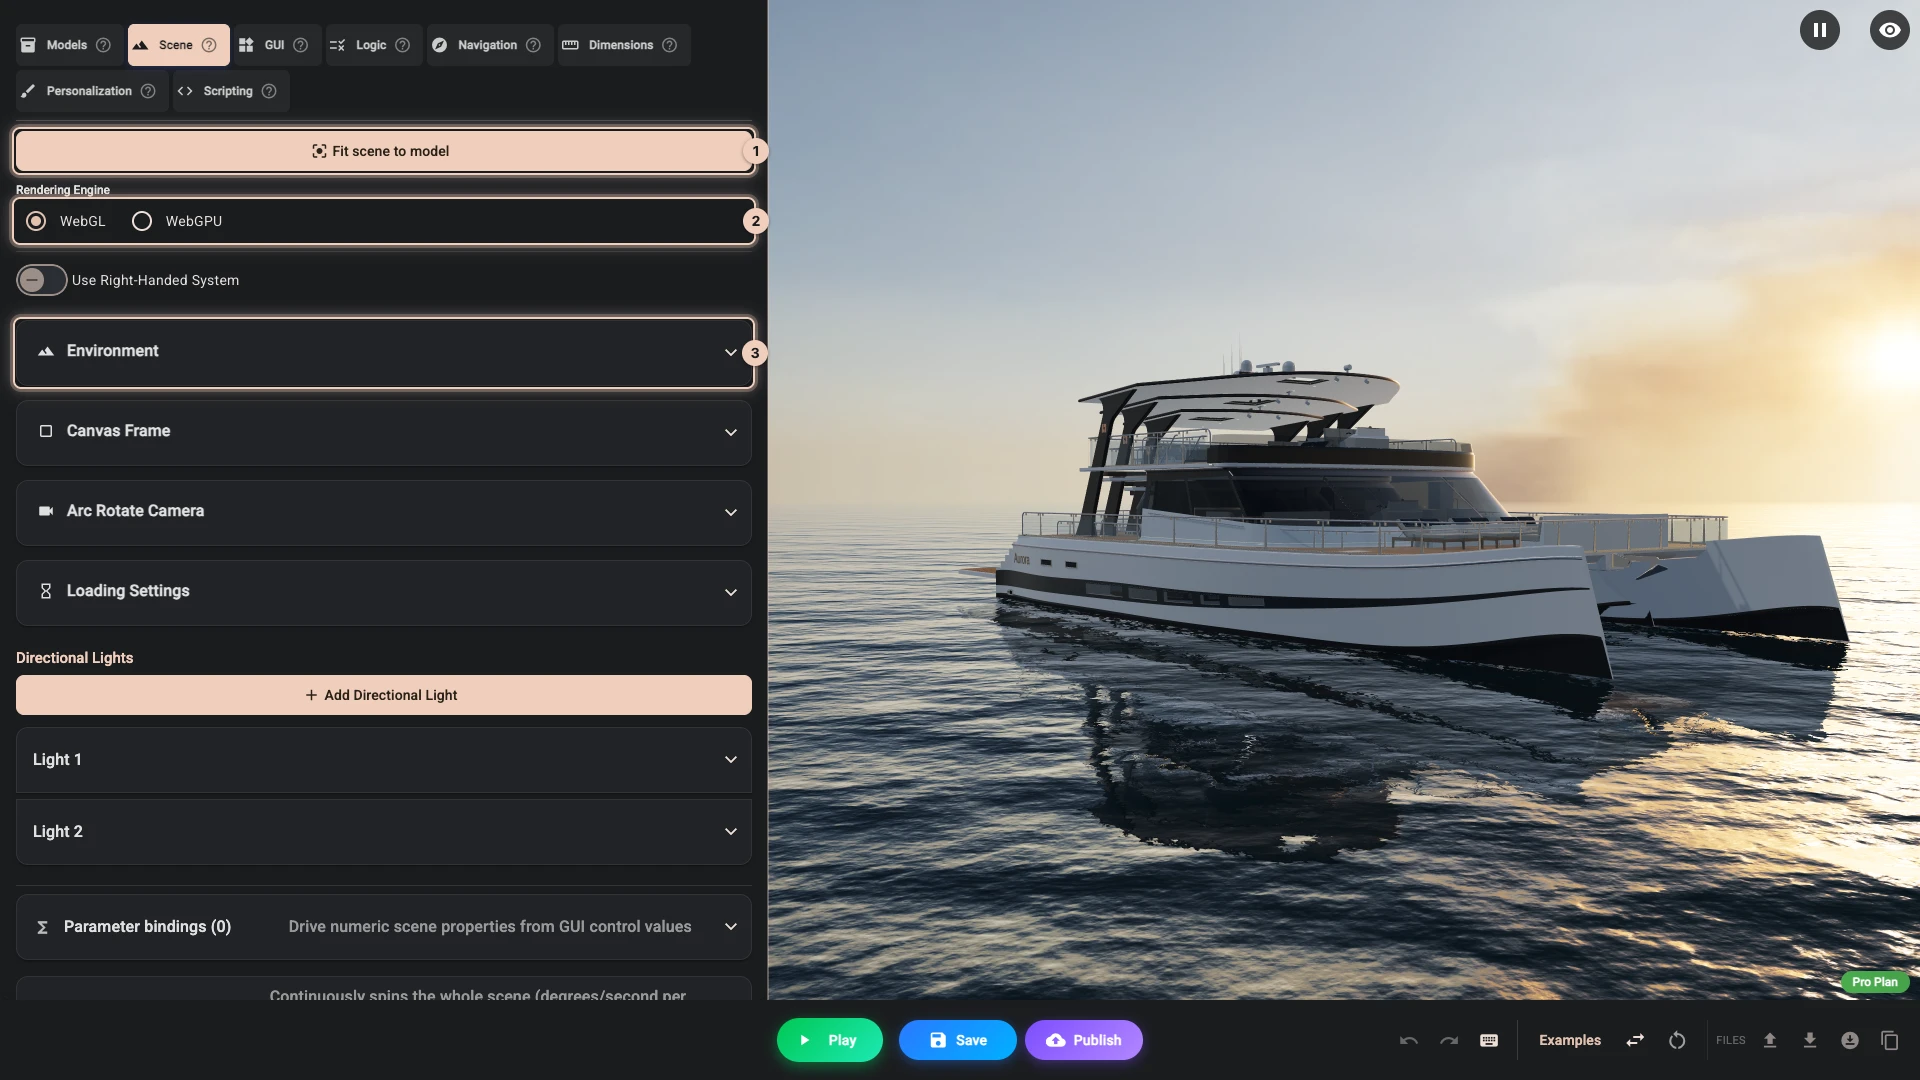
This page runs down the section in the order you see it: Fit scene to model 1 and the rendering engine 2, the Environment group 3, then the panels below it. The camera and the loading screen start out empty, with an add button: Add camera configuration and Add loading settings. Until you add one, the viewer uses its own defaults. Each can be removed again, and Composer asks you to confirm before it does.
The scene is already fitted for you
You do not need to set this up from nothing. When you load a model into a project where nothing in this section has been set yet, Composer measures everything on stage and configures the scene around it:
- The camera - position and target on the middle of your models, zoom limits, near and far clipping, and pan and zoom sensitivities scaled to the size of the scene. Its tilt limits, 1 to 179 degrees, still let the shopper orbit underneath the product: set Upper beta limit to 90 if they should not.
- Two directional lights - a strong white key light that casts the shadows, and a weaker, cooler fill light from the opposite side that does not.
- A skybox - a city environment used for reflections, with Hide sky on, so it lights the product without appearing behind it.
- The background - a soft radial gradient, light in the middle and darker at the edges, which lifts most products away from the page. Gradients need the Standard or Pro plan, so on Base the fit picks a plain light grey, which you can change.
The values it picks are derived from the size and position of your models, and for most products the result is good immediately.
This only happens while the scene has nothing configured yet. As soon as a camera, a skybox, a light or a non-default background exists, Composer stops touching it, because from that point on the settings are yours.
Re-fitting later
Fit scene to model at the top of the section runs that same calculation again on demand.
It is worth pressing when the scene has changed size substantially: you have added several more models, or a much larger or much smaller one, or removed the model everything was framed around. Camera distance, shadow coverage and clipping are all derived from the overall size of what is loaded, so a scene that has grown a lot is usually framed for the product it no longer contains.
Fit scene to model replaces the camera settings, deletes and rebuilds the directional lights, and resets the skybox and the background. Anything you tuned in those four areas is replaced by computed values. The one exception is photographic lighting: while it is on, your sky stays and is only resized, a scene on Plain stays on Plain, and your background stays.
Because that is destructive, Composer asks first. If you have already added a camera, a skybox or any light, changed the background, or switched on photographic lighting, you get a Refit the scene to the models? dialog and nothing happens until you press Refit. If none of those exist yet there is nothing to lose, so it simply runs.
It is also an ordinary edit, so Ctrl + Z (Cmd + Z on a Mac) puts your previous settings back, and Ctrl + Shift + Z re-applies the fit.
Undo only reaches back as far as this editing session, so if you have spent real time on your lighting or camera limits, take a copy of the project from Files before you experiment. Adding one more light by hand is usually a better answer than re-fitting the lot.
Rendering engine
Rendering engine is a choice between WebGL and WebGPU.
WebGL is the default and runs in every current browser. WebGPU can be faster where the browser supports it; where it does not, the product page draws the configurator with WebGL instead. If you are unsure, leave it on WebGL, and check the product page on the devices your shoppers use before you rely on WebGPU.
Switching between them rebuilds the 3D view, which takes a moment. That is expected and your settings are kept.
Beneath it is Use right-handed system, which is off by default. Leave it as it is unless a model comes in mirrored or rotated in a way nothing else explains.
Environment
The Environment group sets up the sky, the way the scene is lit and the ground under the product in three steps, and its Scene variants let a shopper switch between looks. Environment covers the group in full, with every look and the water. The next three sections cover what sits inside it and belongs with the rest of the scene: the sky's own settings, the background and the soft light.
Skybox
The skybox is what the product reflects. Even when you cannot see it, it decides whether metal looks like metal and whether gloss looks like gloss, so it matters most for polished, chrome or glass products.
Pick the sky from the cards on the Sky step, each showing what it looks like. There are nine photographed skies, four built-in environments (Default, Classic clear sky, City and Grey gradient) and Your own file for supplying your own; Plain is no skybox at all.
The photographed skies are real HDR photographs from Poly Haven, on every plan:
| Sky | What it is |
|---|---|
| Studio | A softbox studio |
| Partly cloudy | A midday sky with scattered clouds |
| Clear day | A cloudless deep blue sky and a crisp sun |
| Fair weather | Bright, with many small fair-weather clouds |
| Overcast | A soft grey cloud cover; its sun is weak, so shadows are faint |
| Morning | A low sun through thin cloud |
| Sunset | A low sun at sunset |
| Dusk | Warm pink clouds after the sun has nearly set; its sun is low and soft |
| Night | A deep blue sky with the moon low over the horizon; it lights the scene only faintly, so it suits models with their own lights |
Their Rotation at 0 puts the photograph's sun to the front right of the default camera, and their blur and intensity start from values made for each sky. Detail picks Standard (512 px, about 0.2 to 0.6 MB) or High (1024 px from a 4K photograph, about 0.5 to 1.9 MB, sharper behind the product); High is used at the High quality level - computers, unless photographic lighting's Quality says otherwise - so phones keep the Standard sky.
Hide sky keeps the reflections while showing your chosen background instead of the environment image, which is usually what you want on a product page. Picking a sky card, even the one already selected, switches Hide sky off, and Use that sky on the Lighting step sets it the way the look was made (on for the two Studio looks), so check it after either.
Size is how large the skybox is drawn, Blur softens the sky behind the product so a busy environment looks less distracting, and Environment intensity controls how strongly it lights the scene, until photographic lighting takes that over and hides the field. Rotation turns the sky, and the light and reflections it gives, about the vertical axis, in degrees: use it to bring the bright side of the sky round to the side of the product the camera sees. The boat's sunset is at 180, which stands the sun ahead of the opening view.
Standing the product on the ground
Ground projection flattens the lower part of the sky into a floor the product stands on, so it looks placed in the environment rather than floating inside it, and the shadows from your lights fall onto that floor. The floor is the horizontal plane at height 0, so position your model to rest on it. It works with every skybox type, built-in or custom. Water is a ground of its own, so while the Ground step is on Water this option is replaced by a line saying so, and the sky is not projected.
Ground radius is how far that floor and the sky dome reach from the scene's origin, in scene units. Keep the camera inside it - beyond the radius the projected sky breaks up - so match it to the camera's Upper radius limit. Horizon height is the height the environment was captured at, above the floor - the floor itself is always at height 0. A value close to the real capture height of your panorama, typically 1.5 to 3 in a metre-scale scene, looks the most natural; lower values smear the horizon across the floor.
Keep the camera above the floor with an Upper beta limit of 90 degrees, since from below there is nothing to project. Hiding the skybox hides the floor and its shadows too. While editing, every light is on regardless of its variant rules, so the floor shows all of their shadows; Play applies the rules.
Bringing your own environment, and converting it
Your own file takes a Texture URL pointing at an .hdr or an .env file. You can paste a link or upload the file from the field itself.
.hdr files are the format you will usually be given, and they are the heavier of the two: every shopper's device has to process one into a usable environment before the product can be reflected in it. .env is Babylon's prefiltered format - one file, already processed, much faster to load everywhere.
So Composer converts for you. Point the field at an .hdr and a Convert to .env button appears beneath it:
- Press Convert to .env. The conversion runs in your browser and reports the size of the result.
- Press Download .env to keep the file, or Use on Shopify CDN to upload it to your store's files and repoint the texture URL at the new copy in one step. The second button only appears when Composer is running inside the app, where it has access to your files.
- Publish as usual. From then on your shoppers load the
.env.
Whichever format the field holds, a small preview sphere is rendered next to it so you can see what the environment actually looks like before you commit, and it can be downloaded as an image. Texture size only applies to .hdr sources - an .env carries its own resolution.
Background
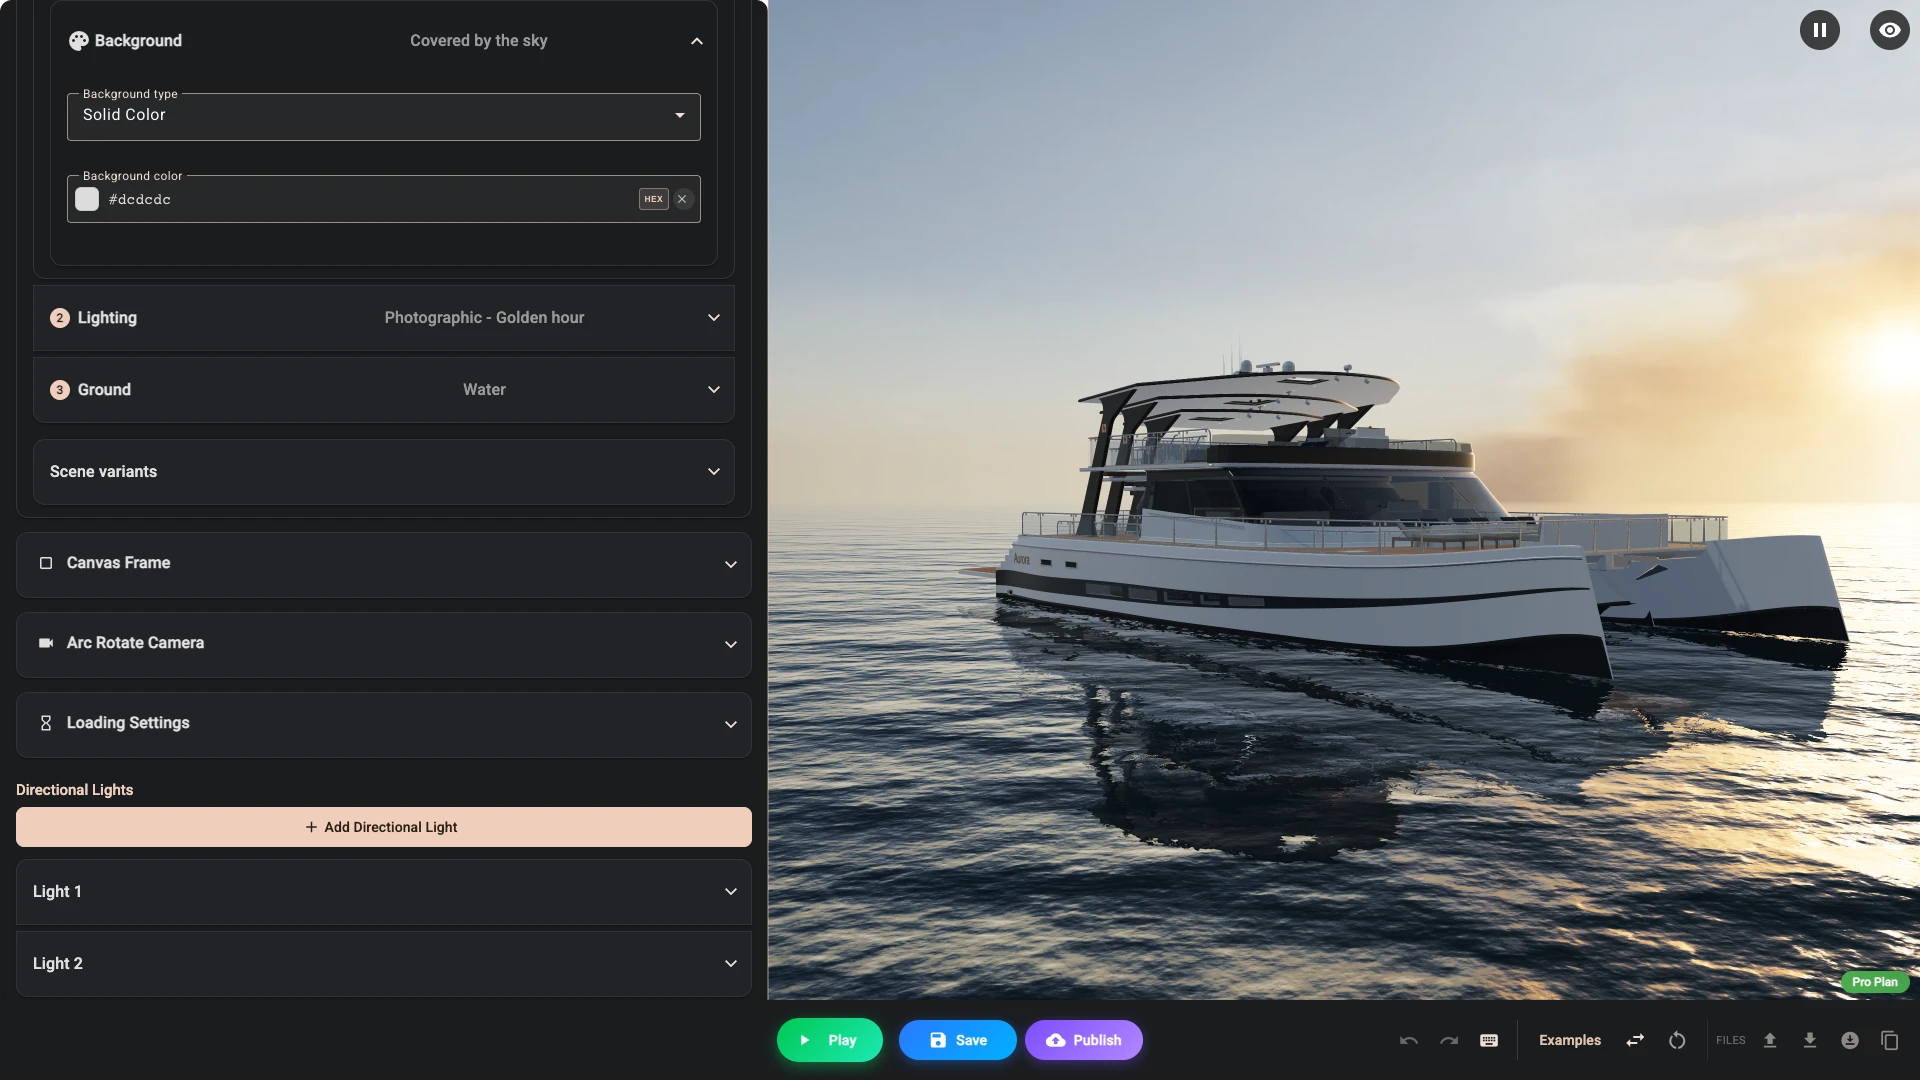
The background shows whenever there is no sky in front of it, so it sits under the sky cards on the Sky step, and opens by itself on Plain. Its title says whether it Shows behind your models or is Covered by the sky, as on the boat's open water.
Background type has four kinds. Solid color on every plan, and Linear gradient, Radial gradient and Image on Standard and Pro.
A plain background in a colour close to your store's is usually the right choice, since it keeps attention on the product. Gradients help when a product is the same tone as a flat background and disappears into it - which is why the automatic fit reaches for a radial gradient rather than flat white.
Lighting
The Lighting step decides how the scene is lit: Simple or Photographic. Directional lights, a list of their own further down, work with either.
Photographic lighting
Photographic gives the product a sun lined up with the sky, soft shadows and tone mapping, from one of five looks. With a photographed sky the sun stands where the photograph's sun is and turns with the sky's Rotation. The sky stays yours whichever look you pick. It replaces the soft light from above while it is on. See Environment.
The soft light from above
On top of your directional lights, every 3D Bits scene has a soft light from above, so an imported model never looks flat or black where no directional light reaches it. Simple on the Lighting step switches it off with Soft light from above or changes its Intensity (1 when empty). Turn it down when the shadow sides of your product look washed out, and off when your directional lights, the skybox's environment or the models' own materials should light the scene alone. Changes show in the 3D view straight away.
Canvas frame
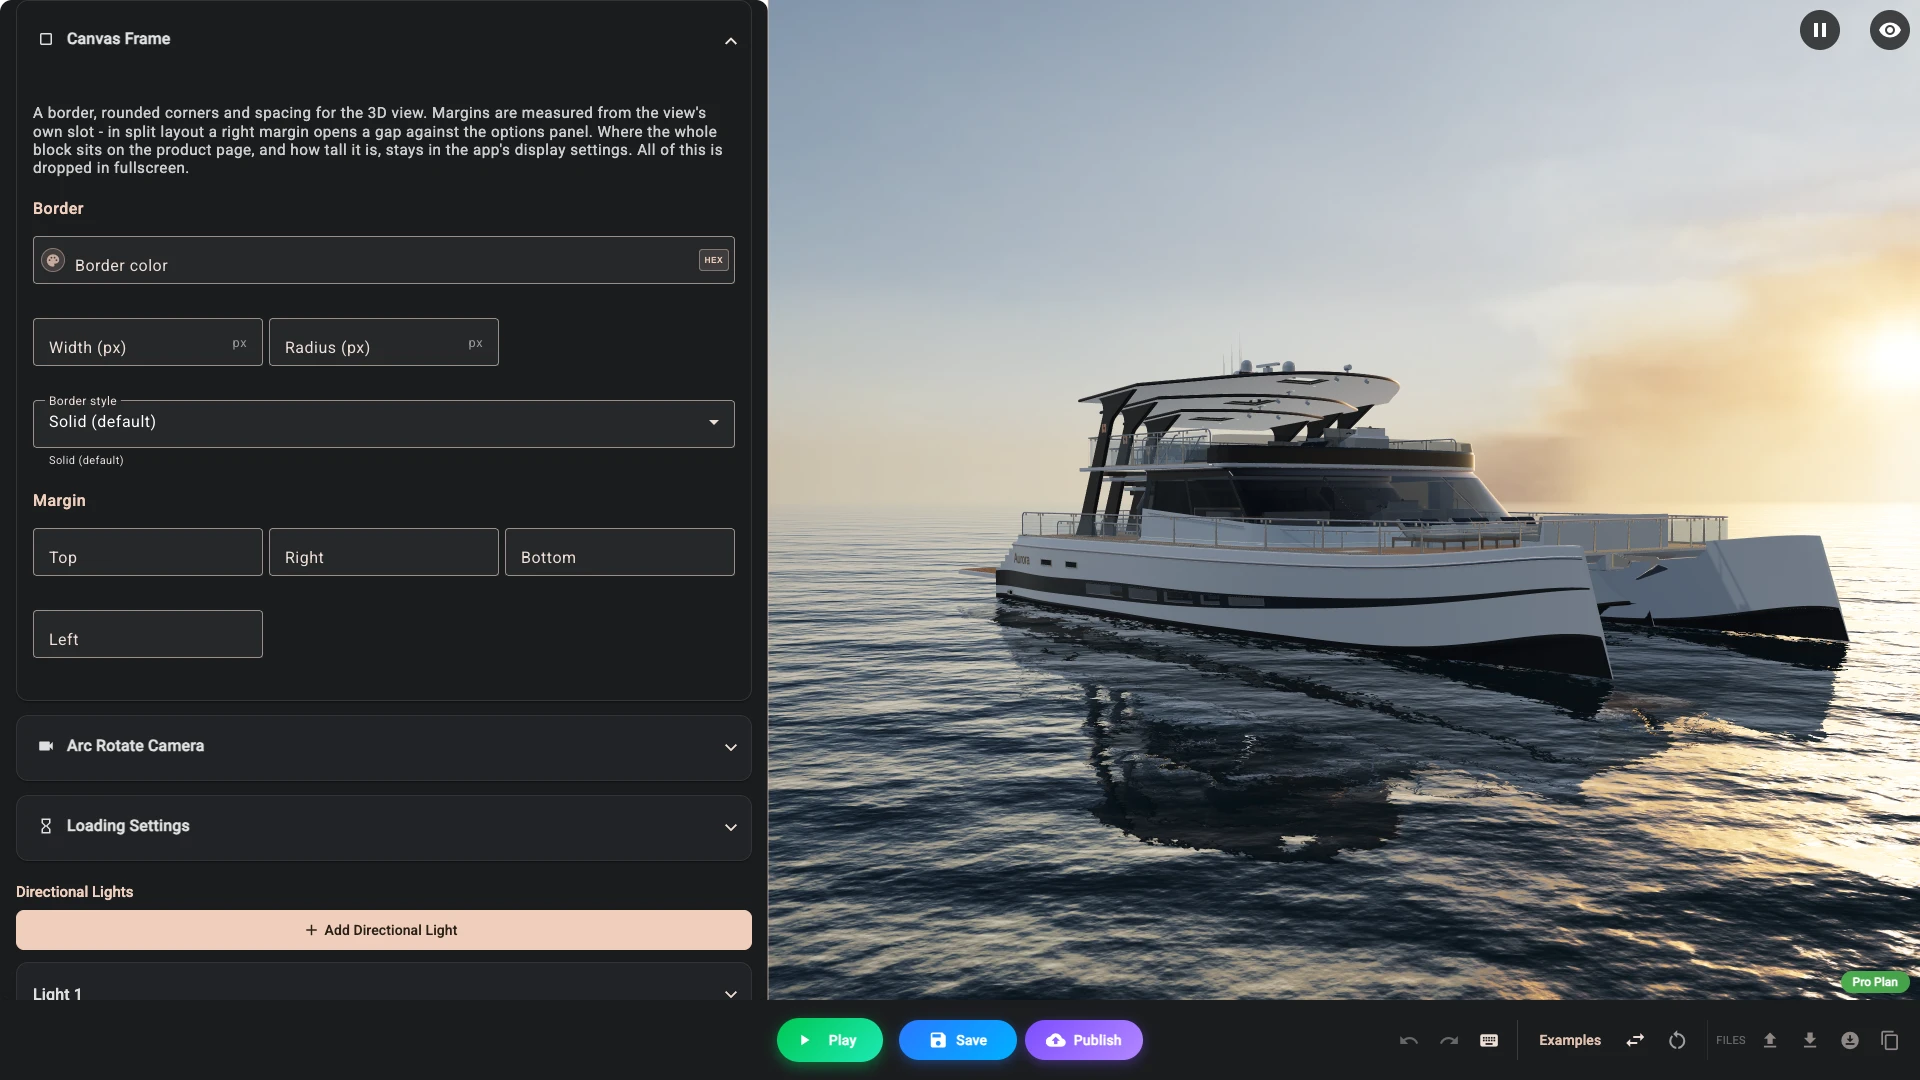
The Canvas frame panel gives the 3D view itself a border, rounded corners and spacing. It is worth a moment, because it is what makes the configurator look built into the page rather than dropped onto it. A hairline border in your theme's border colour, with the same corner radius your product cards use, usually does more than any other single setting here.
- The border takes a colour, a width in pixels, a corner radius and a line style of solid, dashed or dotted. A border only draws once you set a width.
- The margin is set per side and is measured from the view's own slot, not from the page. In the Split layout a right margin opens a gap between the 3D view and the options column; in the Inline layout it simply opens a gap against the page. Areas placed on the canvas corners keep to the framed view, so a margin insets them too.
That is a different thing from the canvas margins in the app's display settings, which hold the whole block off the edges of the page. Both apply, and they are doing different jobs: this panel travels with the project, that one belongs to the product.
Two things behave the way you would want without being told. The whole frame is dropped in fullscreen, where there is nothing to frame against, and options panels and dropdowns float above the view, so the corner radius never clips them.
Camera
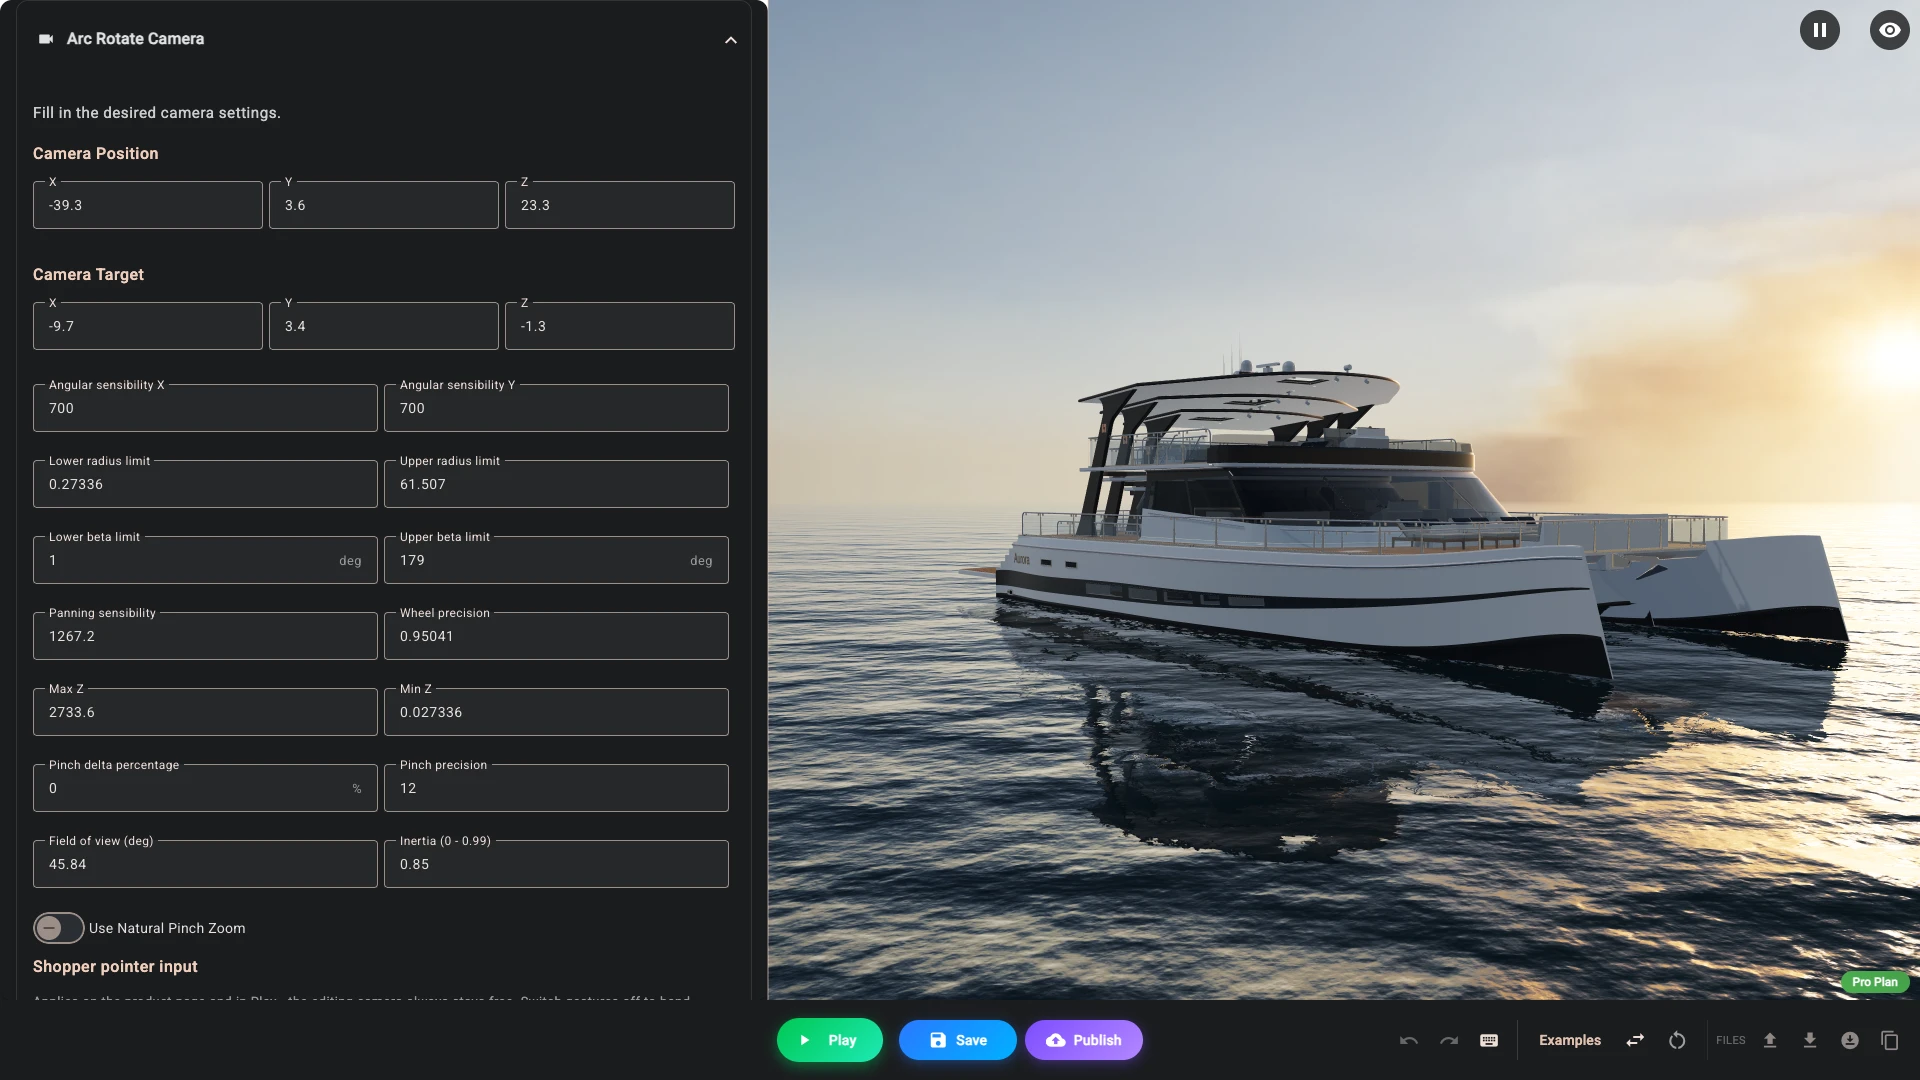
The Arc rotate camera panel holds a camera that orbits around a point, which is the natural way to look at a product. You set where it starts and what it points at, and you can limit how close the shopper may come and how high or low they may tilt.
Clicking into Camera position or Camera target brings up a handle in the 3D view, so you can drag the camera into place rather than typing numbers. The surroundings stands it low off the boat's bow, looking towards the sun.
Limits are worth setting. Without them a shopper can end up underneath the product or so far away it is a speck, and neither shows off what you make.
- Lower radius limit and Upper radius limit are how close and how far the shopper may get.
- Lower beta limit and Upper beta limit, in degrees, are how high and how low they may tilt. This is the pair that stops people looking up at the underside of a hull.
- There is no field for restricting the horizontal orbit. Tilt and zoom are the two the form offers, and between them they cover most products.
- Min Z and Max Z are the near and far clipping planes. If parts of the product vanish when you zoom in close, the near plane is the usual culprit.
Two fields change the character of the shot rather than its limits:
- Field of view (deg) is the lens. Lower values flatten the perspective the way a long lens does; higher values exaggerate it. Left empty it stays at the engine default of about 46 degrees.
- Inertia (0 - 0.99) is how much the camera glides after the shopper stops dragging, from 0 for immediate to 0.99 for very floaty, with 0.9 as the default. High values also swallow slow, precise drags - if rotation feels unresponsive rather than smooth, lower it.
The rest of the panel is pointer tuning: angular sensibility on each axis, panning sensibility, wheel precision, the two pinch settings and Use natural pinch zoom, which makes a two-finger zoom track the shopper's fingers exactly.
Shopper pointer input
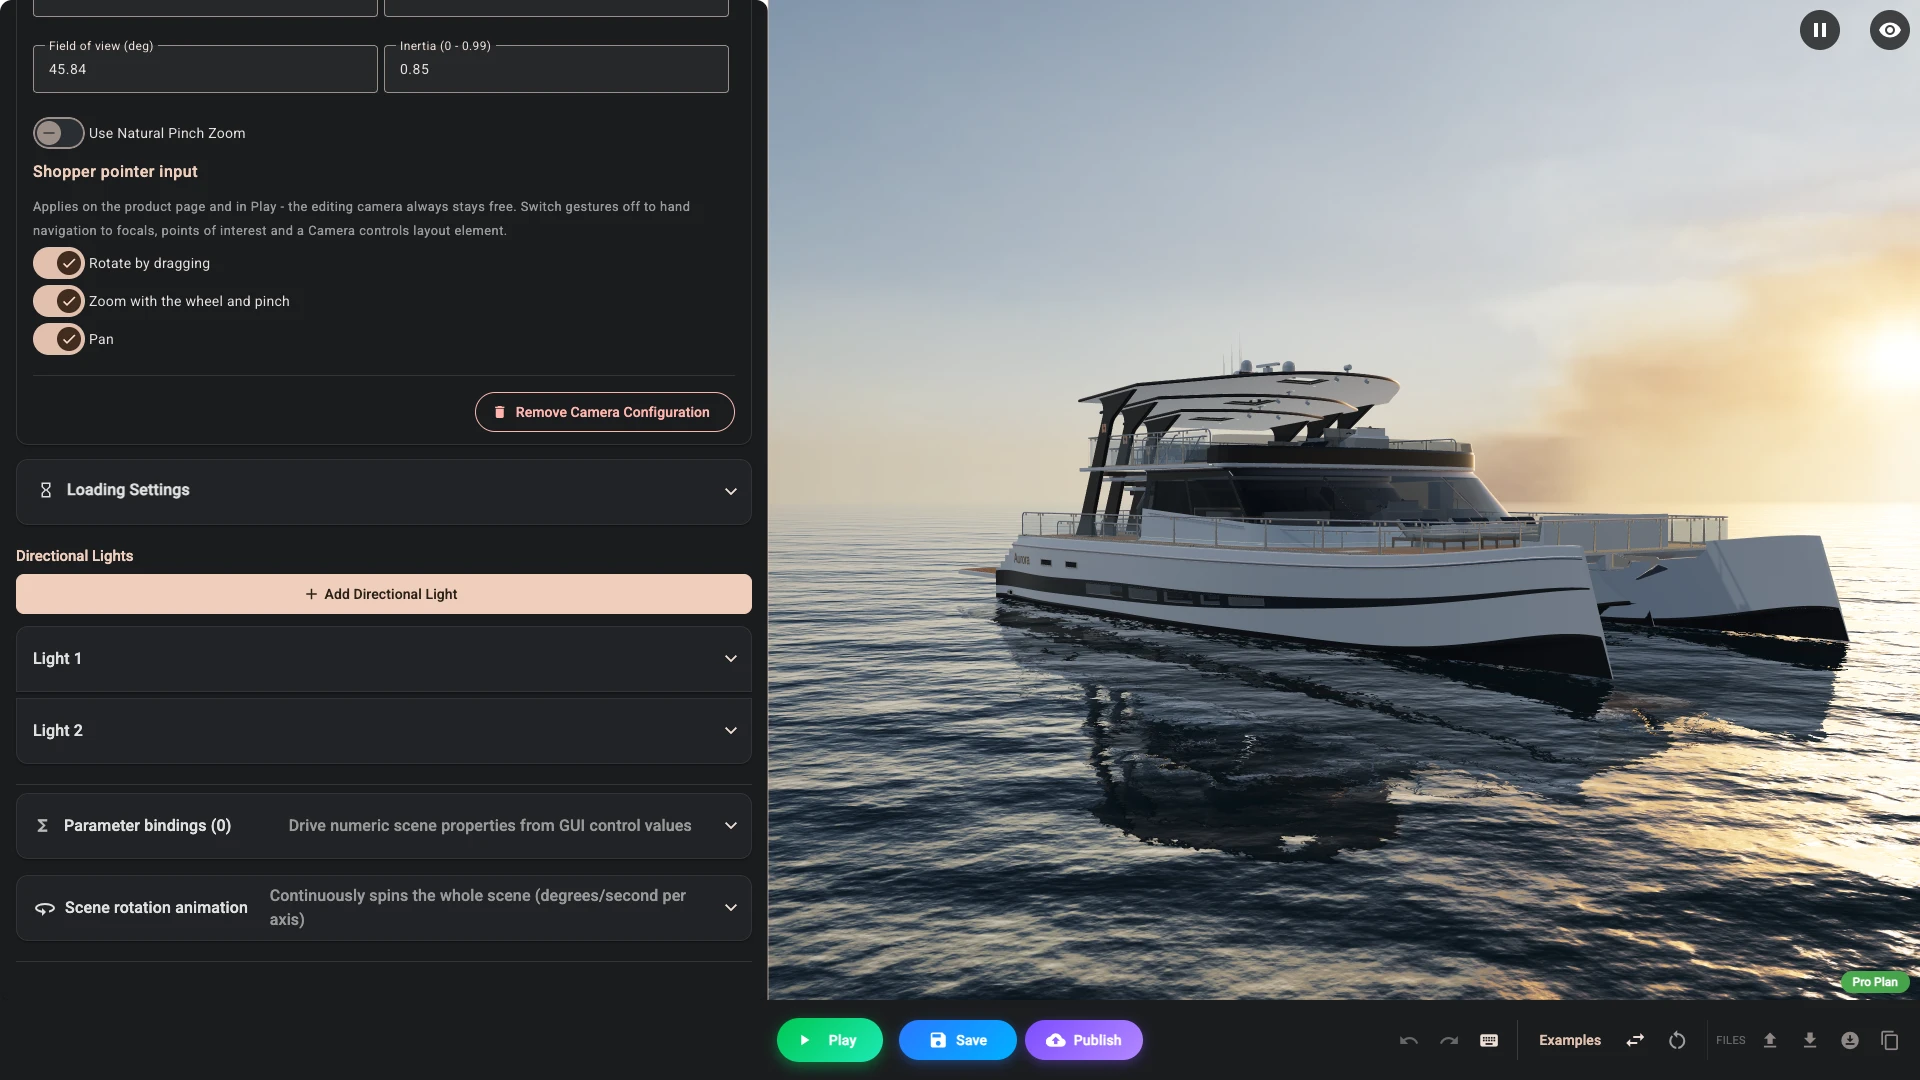
Three switches at the end of the panel decide which gestures move the camera on your product page: Rotate by dragging, Zoom with the wheel and pinch and Pan. They are all on until you change them. Switch one off when a gesture gets in the way of the page - the wheel that should scroll rather than zoom, the one-finger swipe on a phone that should scroll rather than spin the product - and hand the movement to focals, points of interest and the Camera controls layout element instead. Those three draw on Standard and Pro only, so on Base nothing takes over from a gesture you switch off. The switches apply on the product page and in Play; the camera you edit with stays free whatever they say.
Loading screen
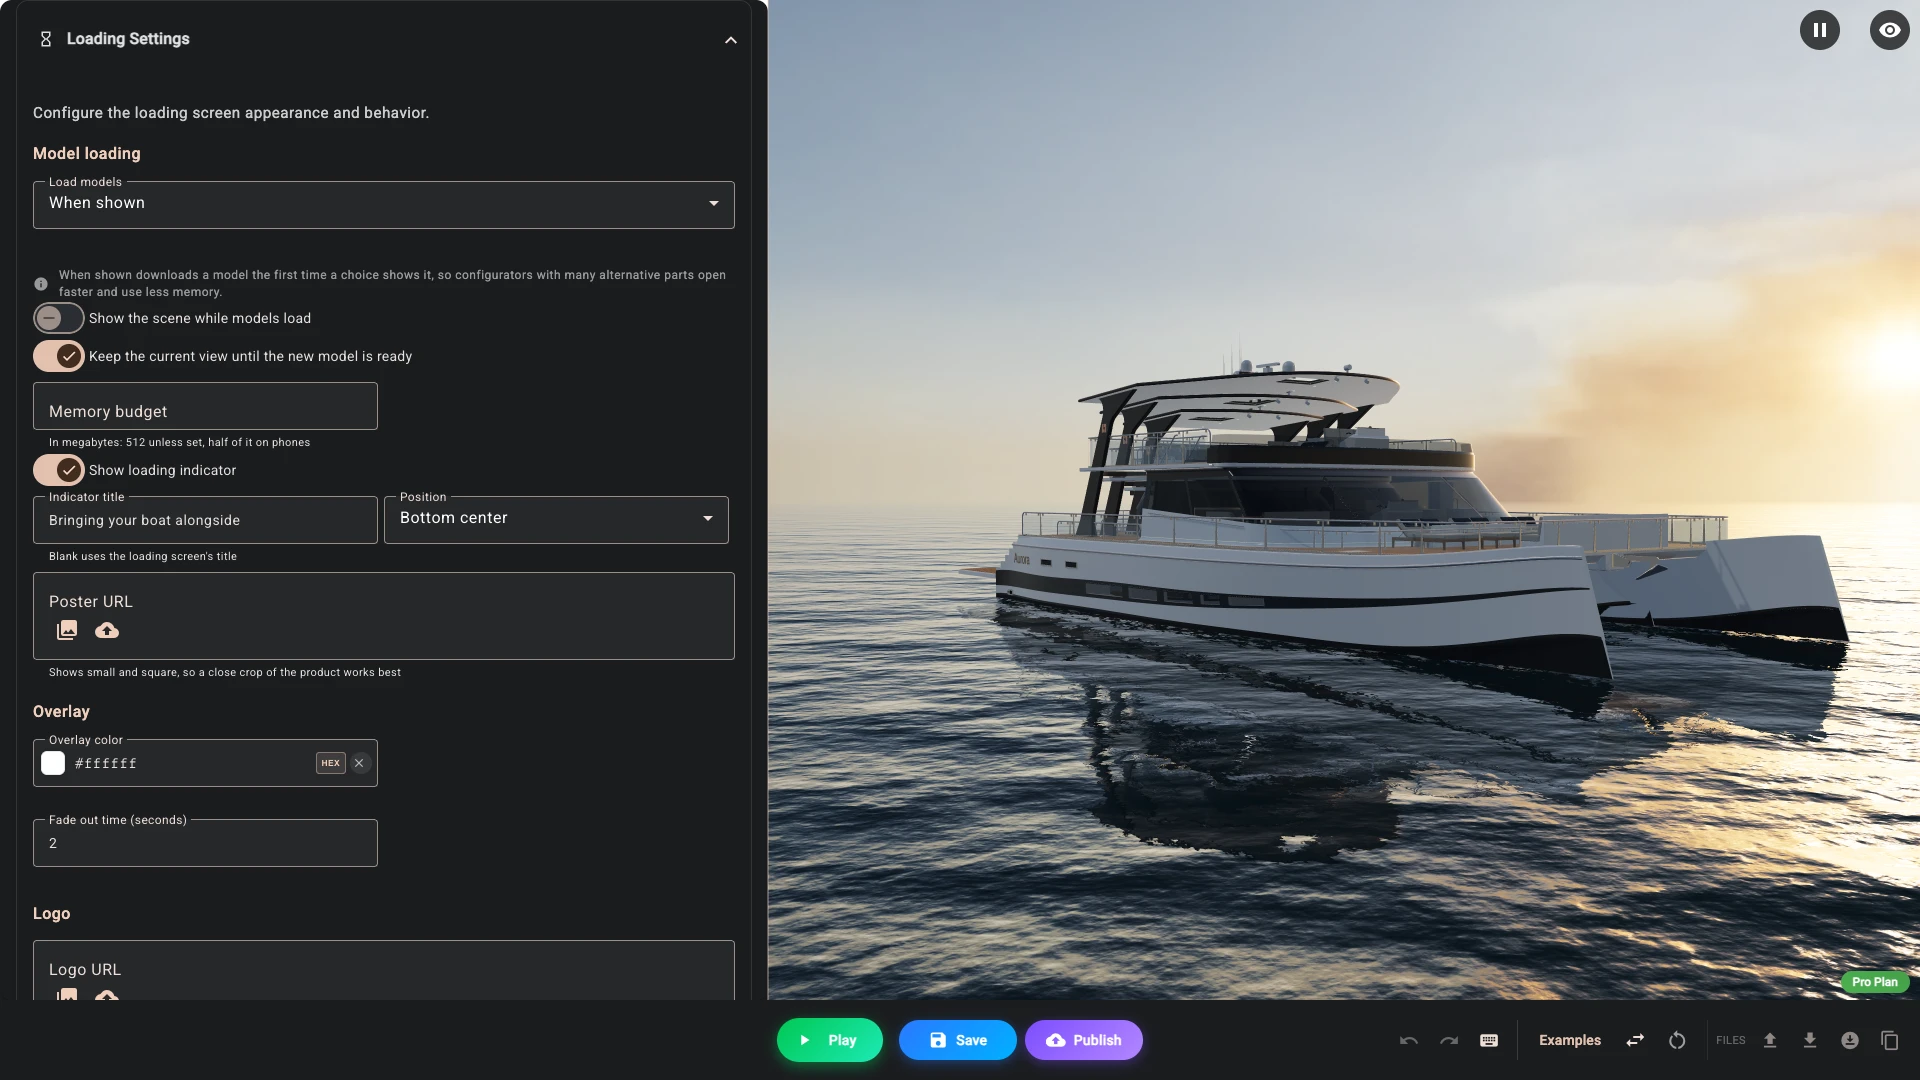
Loading settings holds two things, in this order: when your models download, and what your shopper sees while they do.
Loading models when they are shown
By default every model downloads before the scene appears. A configurator with many alternative parts - five hulls, a dozen wheel designs - makes the shopper wait for all of them, and keeps all of them in the phone's memory, although they only ever see one at a time.
Set Load models to When shown and only the models your opening choices show download at start. Every other model downloads the first time a choice shows it. This is on every plan. Three sizes sets it for the boat, which has a 15 m, a 20 m and a 25 m file.
- Show the scene while models load replaces the loading screen with the small loading bar, so the shopper sees the scene straight away and can already turn the camera while the first models arrive.
- Keep the current view until the new model is ready is on by default. When a choice needs a model that is still downloading, the shopper keeps seeing the current product until the new model has arrived, and then the whole view changes in one step, with no empty frame in between. Turn it off and the view changes at once, with the new model appearing when it arrives.
- Memory budget is how many megabytes the loaded models may hold before models set to free memory When over the memory budget are released. It is 512 unless you set it, and phones use half of it.
- Show loading indicator puts a small bar over the scene while a model is downloading, with the title and how far the download has come. The scene stays live underneath, and the bar takes its look from your GUI theme, so it matches your panels. Set its words with Indicator title, or leave them blank to use the loading screen's title, and choose where it sits. It appears only if the download takes more than a moment, so a model that is already in the browser's cache never flashes it.
- Poster URL is a small picture of the product in the loading bar, on the left of its words. It shows small and square, so a close crop of the product works best.
Each model can also set its own timing - see When to load. Composer suggests When shown when it sees two or more large models that only show for different choices of the same option.
A scene with scripts always loads every model at start, because a script may reach any model. In Composer, Play follows these settings; the editing view always loads every model, so you can work on all of them.
What the shopper sees meanwhile
Your shopper sees this before they see the product, so it is worth two minutes.
Start with Overlay color, because it is the whole screen: it is what covers the canvas while the model loads, and matching it to your page background is what stops the configurator flashing white on arrival. Next to it, Fade out time (seconds) controls how gently it clears.
On top of that you can put a logo with its own width and height, a progress bar with its own track and fill colours and a height, and a line of text with a title, size and colour. Putting your own logo here makes the wait feel like part of your store rather than a blank pause.
The percentage counts the model's real download, and the last tenth waits for the model to be built, so it says 100% only when the model is ready. After that the screen stays up while the scene is drawn, with a moving bar and your Drawing title, and it only fades once the product is on the canvas. Blank shows "Drawing...", or your Loading title if you changed it, so a translated page never shows English words. GLB files always show a number. A format that gives no size shows a moving bar with no number instead.
Keep in mind that the best loading screen is a short one. If yours is on screen long enough to read, the model is probably too heavy. See What to Expect.
Directional lights
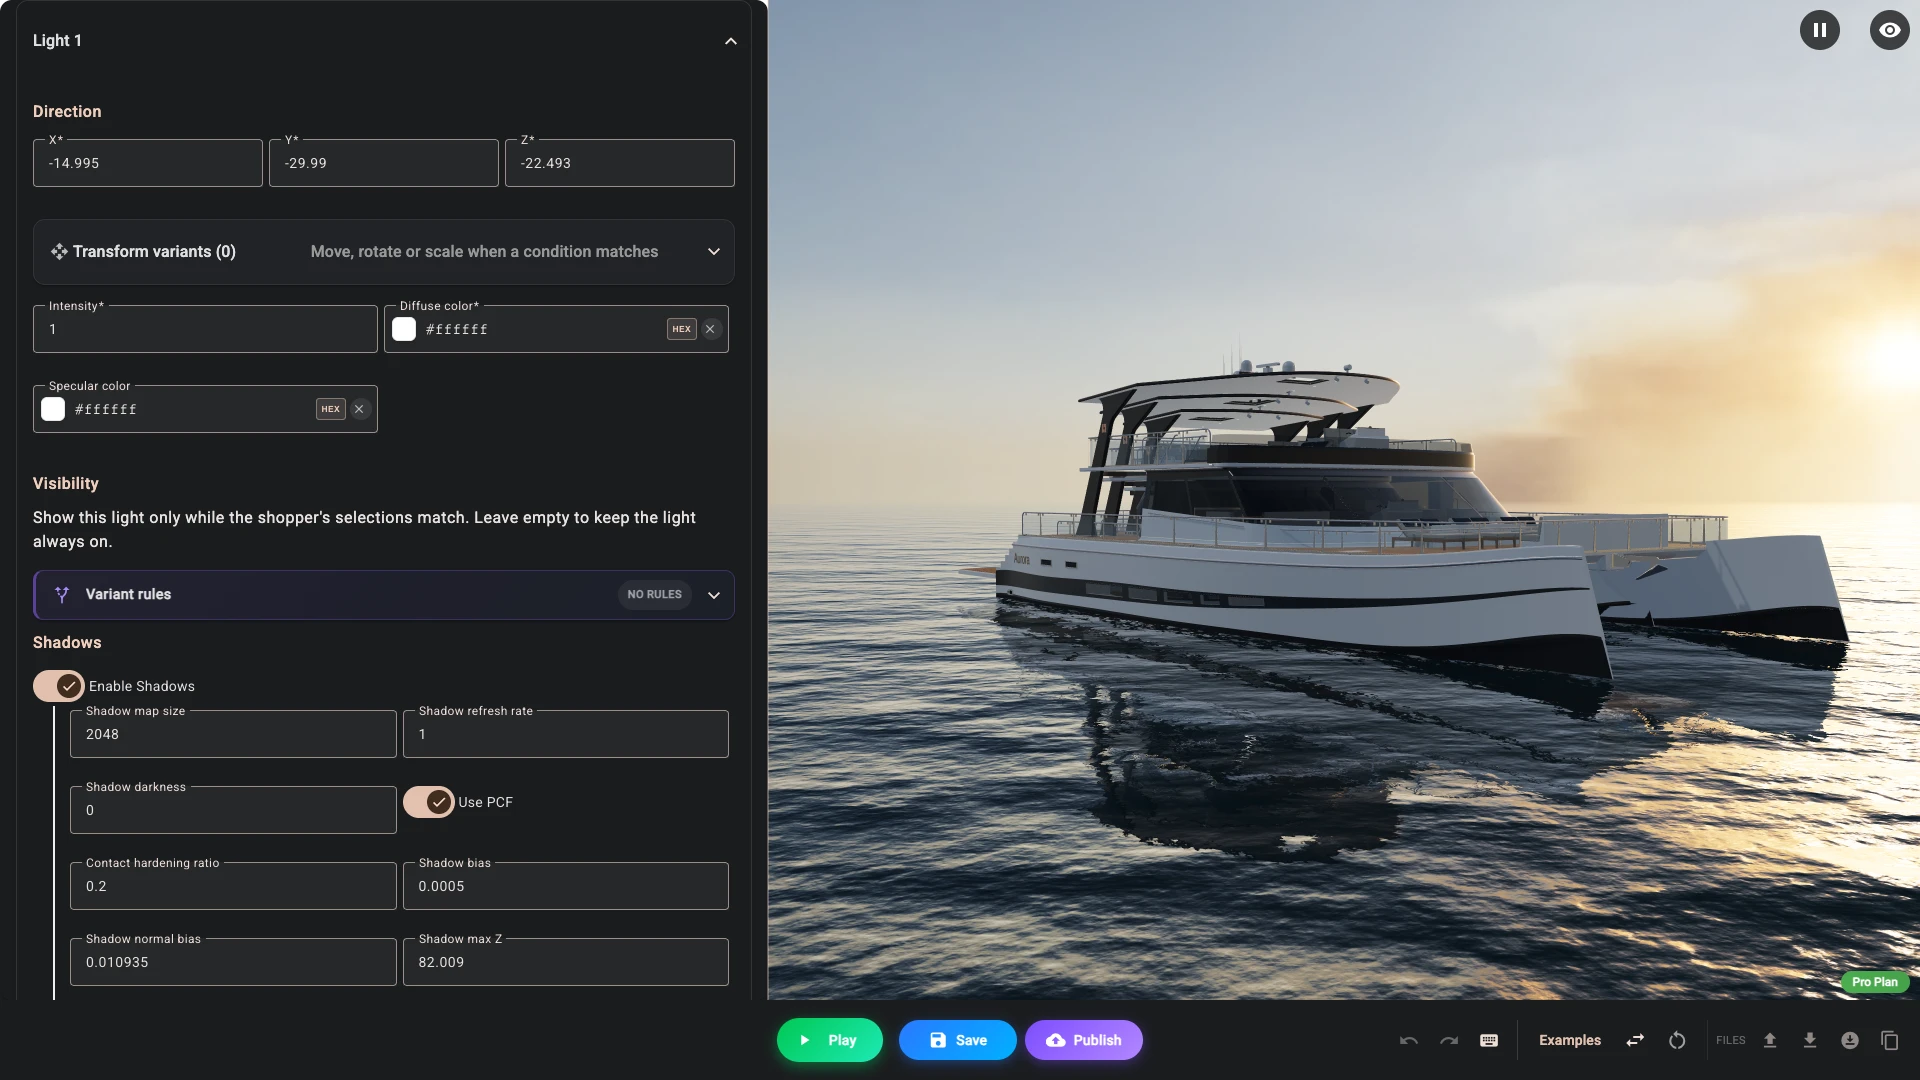
Directional lights behave like the sun, casting parallel light from an angle. Add directional light as many times as you need, and set the direction, colour, intensity and whether each one casts shadows. Each new light goes to the top of the list with Enable shadows on, so switch shadows off on every light but the one that should cast them.
Two or three lights is usually right. One strong light gives shape, a weaker one from another angle stops the shadow side going black, and a third from behind can lift the product away from the background. Only one of them normally needs to cast shadows - that is what the automatic fit does, and every extra shadow-casting light costs performance for very little gain.
As with the camera, focusing a light's direction field gives you a handle in the 3D view. Dragging it is the fast way to work, because you can see what the light does as you move it.
Direction, intensity and the diffuse colour are required for every light. Turning on Enable shadows opens the shadow settings for that light: map size, refresh rate, darkness, softer filtering, bias and the shadow depth range. There is also a Transparency shadows toggle for the case where semi-transparent materials should cast a shadow too. Clone light copies a light with its settings, which is the quick way to build a matching pair.
Lights that only appear for some choices
Each light has a Visibility block of its own. Leave it empty and the light is always on. Fill it in and the light is only enabled while the shopper's selections match, exactly the way a model or a part is gated.
That is more useful than it sounds. A warm lamp that only comes on when the shopper picks the version with a lamp in it, a rim light that only appears behind the dark finishes that need it - both are a light with a condition rather than a second scene.
A rule in the Logic section can also force a light on or off, and when it does the rule wins over the light's own condition.
Lights that move with the configuration
Each light also has its own transform variants. For a light, the only thing a variant can change is the direction - the first variant whose conditions match wins, and the base direction applies when none do. A variant with no conditions never activates.
You can choose whether the change is instant or animated, and an animated one takes a duration in milliseconds and an easing. Swinging the key light around as the product opens, rather than snapping it, is what that is for.
Parameter bindings
These connect a shopper's choice directly to a number in the scene.
Say you have a slider for a length. A binding can drive the actual scale of a model from that slider, so the product physically stretches as they drag, without any script involved.
A binding is three things:
- A target. A whole model, a single node inside a glTF file, or a directional light.
- A property. Position, rotation or scaling on one axis for models and nodes; direction on one axis, or intensity, for a light. Rotations are in degrees.
- An expression. A small formula over your control values, written the same way price formulas are: the names in it are control keys, and functions such as
min,max,clampandroundare available.ctrl_width / 100andclamp(ctrl_x, 0, 50)are both valid.
The result is applied continuously, on every change, as the last word on top of the base transform and any transform variant that happens to be active. If an expression produces something that is not a usable number, that binding is simply skipped for that combination rather than breaking the scene. Each binding can be named, and switched off with its Enabled checkbox without deleting it.
By default a range slider reports its value when the shopper lets go. Set that control's Emit mode to On change in the Controls tab and the binding updates live as they drag.
This is the simplest way to make a product respond continuously rather than in fixed steps, and it covers a lot of ground before you need Scripting. For discrete states - open or closed, position one or position two - use a transform variant instead.
Scene rotation
Scene rotation animation is a slow automatic turn, set as degrees per second around each of the three axes independently. Good for a hero product that should look alive while a shopper reads the page, and easy to overdo. If your configurator has many options to click through, a moving product can make it harder to use.
It turns the scene content like a turntable around the world origin - your models together with their points of interest, dimensions, decals and directional lights, so the lighting stays put relative to the product. The camera, skybox and background do not move.
It runs in Play mode and on the live product page. The editor deliberately keeps the scene still while you are working, so nothing drifts out from under a gizmo while you are placing something.
Verified against the product in November 2026