Dimensions
On Base this section stays closed, and neither the product page nor Play draws the dimensions a project holds. Publishing does not refuse them: they simply do not appear. The editor still draws them while you work, so one can look finished and be gone in Play.
For anything sold by size, the question behind the purchase is always the same: will it fit. Dimensions answer it on the model itself, with the measurement drawn where the shopper is already looking.
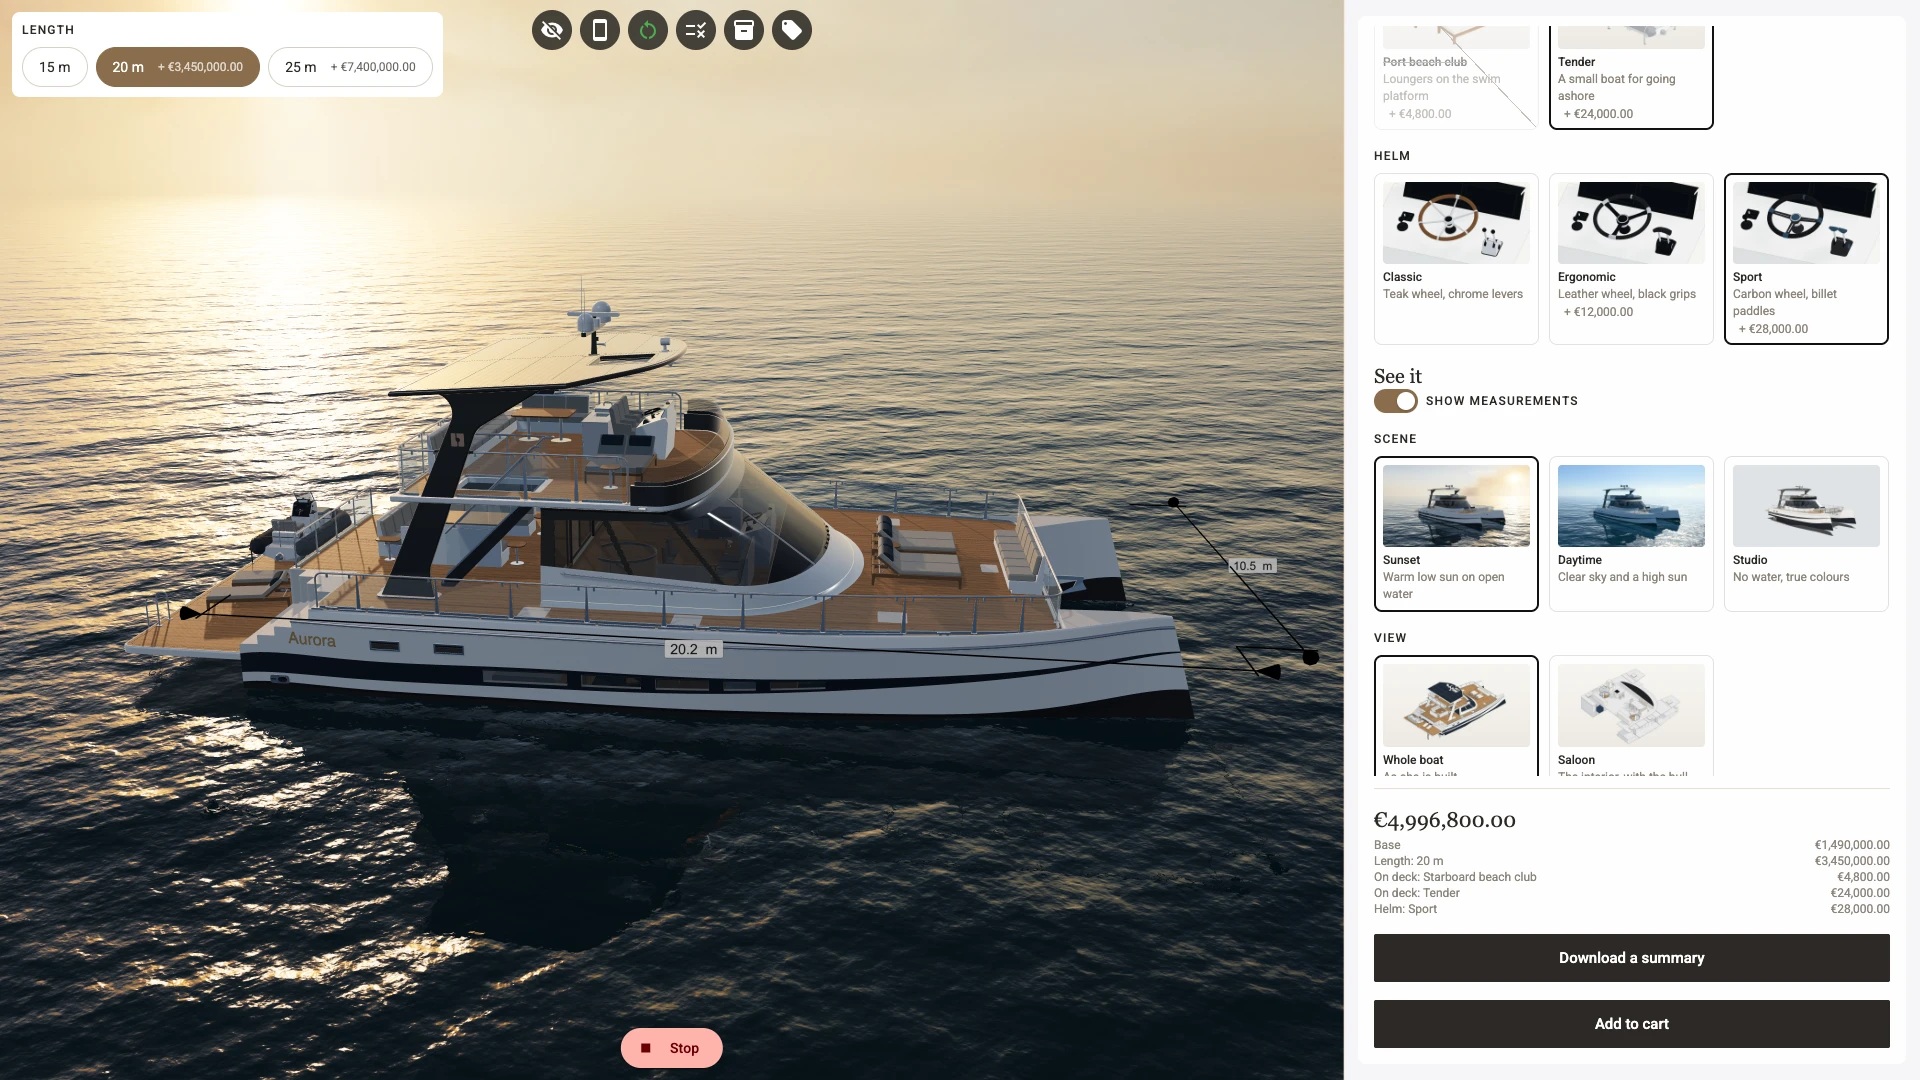
One thing to be clear about before you start. Only the Bounding box type measures the product for itself. The other five are drawn between coordinates you supply, and they show the same number no matter what the shopper picks. That is not a shortcoming - a fixed annotation is exactly what you want on a fixed feature - but if you need a number that follows the configuration, see Making a dimension follow the configuration below.
The six types
Each type has its own tab in the section.
Linear measures the straight distance between two points you give it. Width, height, depth, the gap between two decks. This is the one you will use most, and for many products it is the only one needed. The Direction vector is added to both points to place the line: its direction picks the side of the feature, and its length how far out.
Angular measures the angle between two direction vectors around a centre point, for a raked windscreen, a hinged ladder or a sloped panel. You set the Radius of the arc it draws. The number is in degrees. Turn on Display in radians for radians, and the suffix ° becomes rad. A Label override of your own works on the angle in radians, so write val*180/3.141592653589793 in it for degrees.
Radial measures from a centre point to a point on the curve, and Show as diameter prints that as a diameter instead. Use it for a fillet or a rounded corner. Show center mark draws a centre mark or leaves it off.
Diametral draws a diameter annotation across a circular feature: a centre point, a direction for the line, and the Diameter you type. Unlike radial, it does not derive the number from geometry. It presents the figure you give it, which is the right shape for a nominal size such as a pipe bore or a stated tube diameter.
Ordinate measures a point's distance from a reference origin along one chosen axis, which is how a technical drawing marks hole positions along a rail. Useful for mounting patterns where the shopper needs to check against something they already own. Show leader line draws a short line from the measured point to its label.
Bounding box is the automatic one. Rather than picking points, you point it at your models and it measures their overall extent. For "will this fit through my door" this is exactly right, and it costs almost nothing to set up.
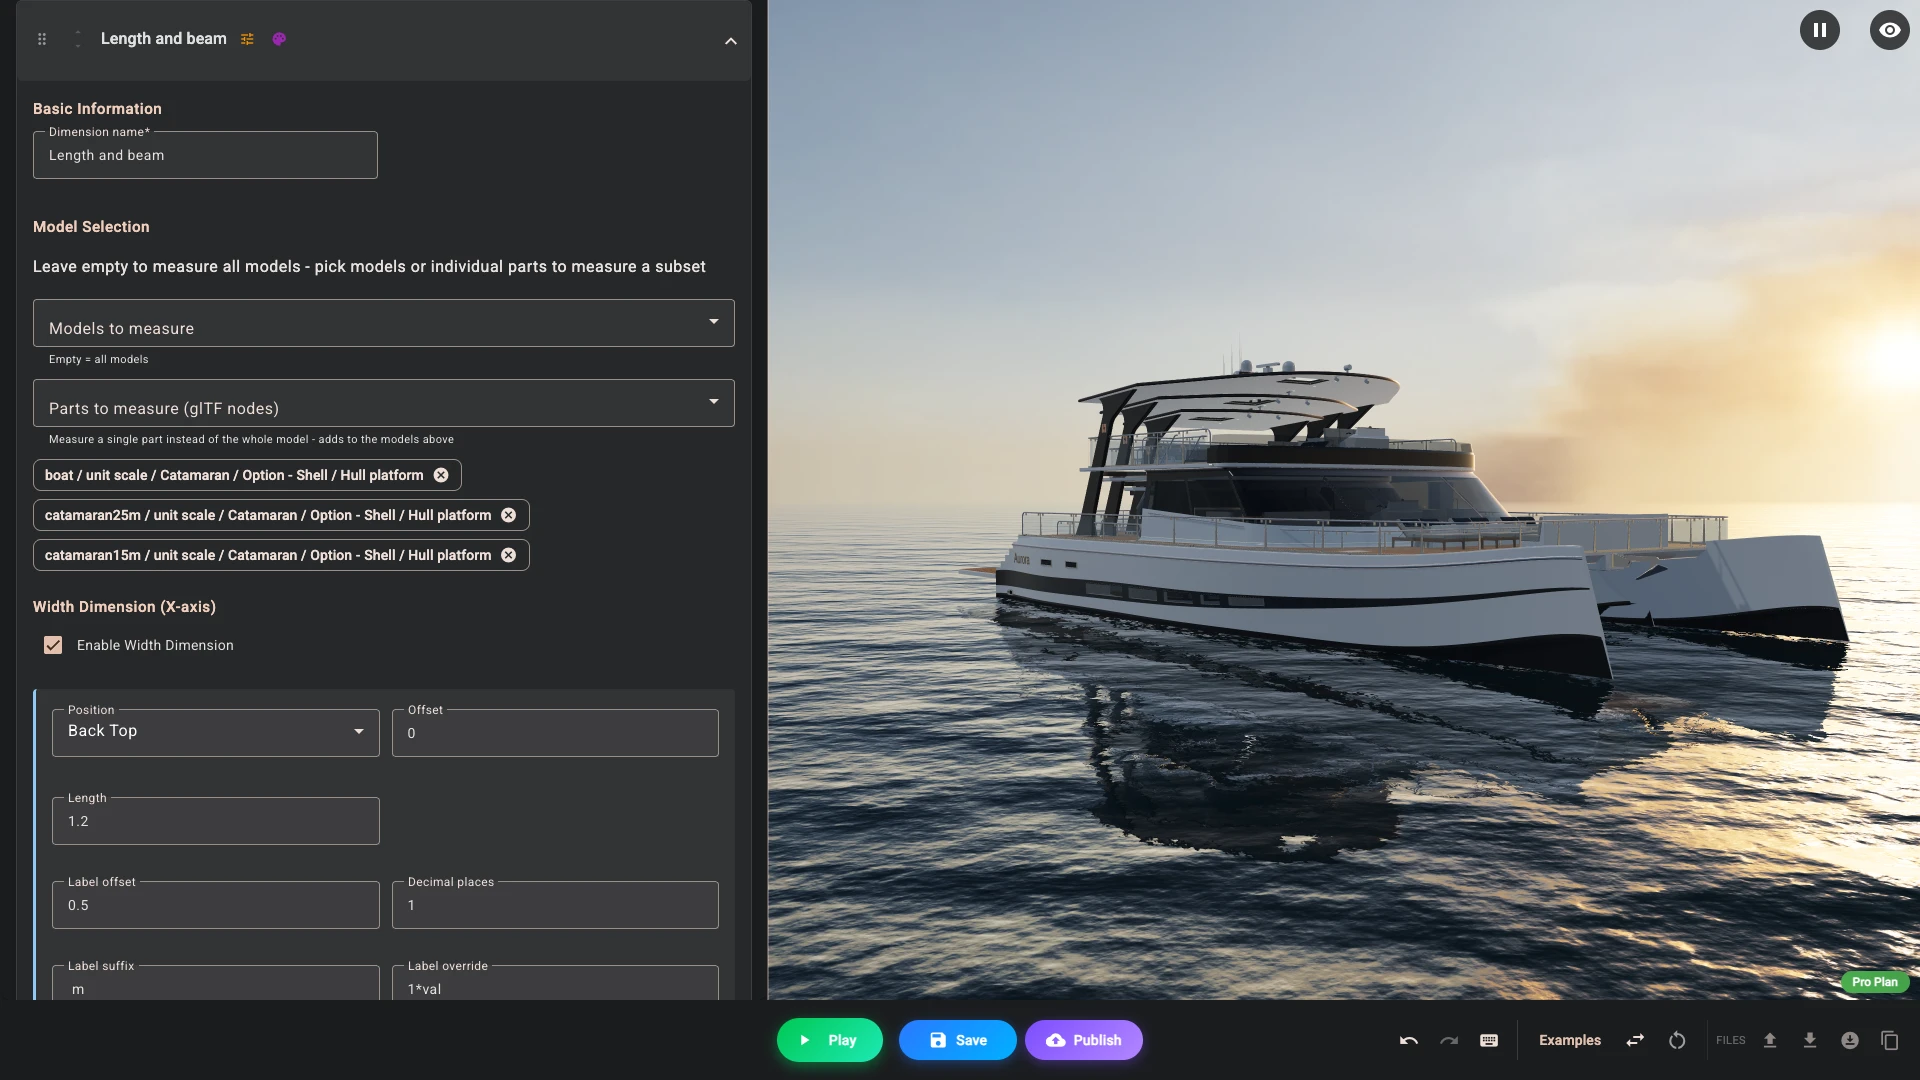
By default it measures everything in the scene. You can narrow it under Models to measure, or, once you have parsed a model's glTF structure, to individual parts under Parts to measure (glTF nodes), and the two selections add together. Only meshes that are actually visible count, so a part hidden by a condition or a logic rule drops out of the measurement rather than inflating it. That is how one dimension serves all three boats: it lists Hull platform on each of them, and only the boat on screen counts. If nothing it points at exists any more, the dimension is skipped rather than measuring the whole product. If only some of it is gone, it quietly measures what is left. While you edit, every model and part is shown, so a bounding box there measures them all together: check its number in Play.
Each bounding box carries three sub-dimensions, under Width dimension (X-axis), Height dimension (Y-axis) and Depth dimension (Z-axis), and each is enabled separately, so the boat can show its length and beam without a height line cluttering the view. All three start on. Each one has its own Position, Offset and Length (the last two push the line away from the box), Label offset, Decimal places, Label suffix, Label override and styling. Show it off sets one up on the boat.
Setting them up
You type the coordinates, and the annotation draws itself. Unlike markers and decals, dimensions have no drag handles in the 3D view, so the practical way to place one is to read the numbers off the model and adjust until the line sits where you want it. Move the camera as you go: a line that looks right from the front is often floating in front of the product from the side.
Each one can be styled, so the line colour and thickness, the arrow size, colour and tail length, the extension lines and the text suit your product rather than shouting over it. You can also have no arrows at all. A style can be copied from one dimension and pasted onto others, which is the fastest way to keep a set consistent.
Dimensions can be cloned, reordered and named. A name is required: it is what Logic's rules and its Overview show.
Like everything else in Composer, dimensions can be conditional. Show the depth measurement only while a control about fitting is on, or show a different set of dimensions for each length.
Making a dimension follow the configuration
There are two ways to get a measurement that changes with the product, and they suit different situations.
Let the bounding box do it. This is the straightforward one. Because it measures the visible meshes rather than remembered coordinates, it simply follows: swap in a longer boat, hide a section, move something with an Instant transform variant, and the number updates with no further work from you. An Animated one is measured where it started, and the number does not catch up. Narrow the selection to the models or parts that define the size you are quoting, and it keeps quoting that.
Draw one dimension per state and condition them. For the five fixed types, the honest approach is a dimension per configuration, each with a condition, so exactly one is on screen at a time. It sounds laborious and usually is not, because a product with three lengths needs three dimensions, not thirty. To state a number the geometry does not contain, such as a nominal size, use Diametral or write it in Label override.
A fixed dimension can additionally carry transform variants, which shift the whole annotation rigidly when a condition matches. That moves the line to keep up with a part that has moved, but it does not change the measured number, so use it to reposition an annotation rather than to re-measure.
Units and honesty
Two fields decide what the label reads, and it is worth being precise about which does what.
Label suffix is text appended after the label. It is a label and nothing else: it converts nothing, and it starts as mm on a new dimension. A glTF model is in metres, so a 1.2 m part reads "1.20 mm" until you change it. Typing in after a value measured in millimetres produces a millimetre figure with the word "in" beside it, which is worse than no unit at all.
Label override is an arithmetic expression evaluated over val, the measured value. val/25.4 on a millimetre model prints inches. val*100 turns metres into centimetres. If you write something that is not arithmetic, the text is used as a template instead and val is replaced by the formatted measurement, so Approx. val prints the word "Approx." in front of the number. Every val is replaced, even inside a word, so value would print as 1.20ue: keep the rest of the text free of those three letters in a row.
Use them together and they agree: Label override val/25.4 with Label suffix in gives you a genuine inch figure with an inch label. Decimal places then controls how many digits the result carries.
Be careful that what the dimension says matches what you ship. The boat's bounding box measures the hull, so the 20 m boat reads 20.2 m. A dimension is a promise.
Presentation
Dimensions work best switched off by default and revealed when asked for, through a control the shopper toggles, which can sit inside an accordion about sizing. A product covered in measurement lines the moment it loads looks like a technical drawing rather than something you want to own.
For a workshop, the same is not true. The order PDF on the Pro plan captures the scene as it stands at that moment, so any dimension showing then is in the picture - and there, dimensions are exactly what is wanted.
Verified against the product in November 2026