Block Settings
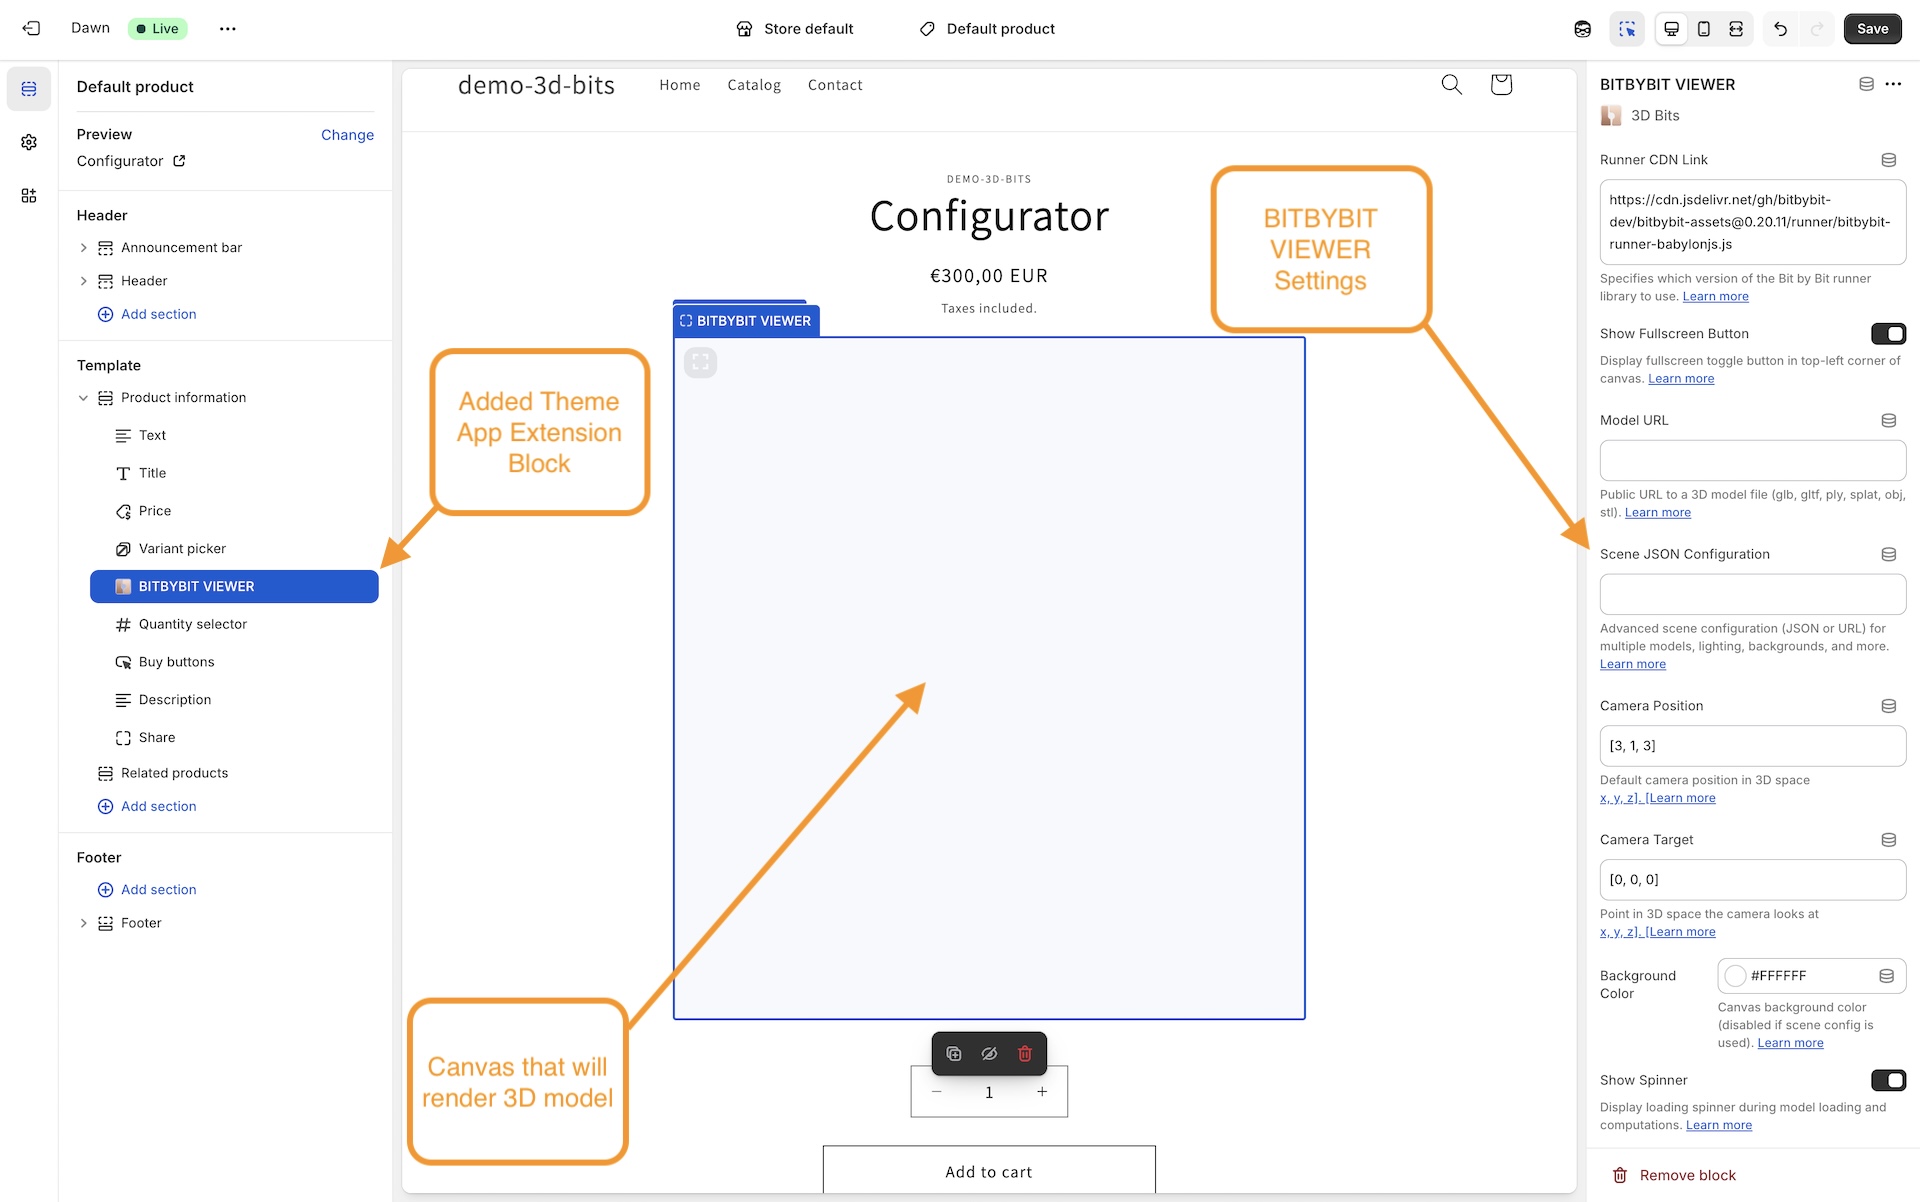
This guide explains all available settings for the BITBYBIT VIEWER theme app extension block in Shopify. Use this block to display 3D models directly on your product pages-no coding required.
You'll find the BITBYBIT VIEWER settings in your theme editor after adding the block to a template.
Available Settings
Product-Specific Settings
Common Settings (Viewer & Runner)
- Camera Position - See full documentation
- Camera Target - See full documentation
- Background Color - See full documentation
- Runner CDN Link
Common Settings (All Blocks)
- Show Spinner
- Receive Input Names As Variants
- Input Collection Mode
- Enable Debug Mode
- Try to Prepend
- Prepend With Query Selector
- Remove Children Before Prepend
- Show Fullscreen Button
Dynamic vs. Global Settings
Understanding which settings should be product-specific vs. global is important for all 3D Bits blocks. See Common Settings: Dynamic vs. Global Settings for the full explanation and How to Link Settings to Metafields for step-by-step instructions.
VIEWER-Specific Recommendations
Settings you should link to metafields (vary per product):
Settings that typically remain global (configured once):
- Runner CDN Link
- All common settings (Show Spinner, Show Fullscreen Button, etc.)
- Canvas positioning options (Try to Prepend, etc.)
Many settings described here can be overridden by Scene JSON Configuration. Scene configurations provide more powerful control over your 3D viewer, including:
- Multiple models with variant-based visibility
- Advanced backgrounds (gradients, images, HDR skyboxes)
- Custom lighting and shadows
- Dimension annotations and points of interest
- Advanced camera controls
Use the Viewer Editor to create scene configurations visually without writing JSON manually.
Note: Available features depend on your subscription plan. See subscription plans for details.
Runner CDN Link
This is a common setting shared across multiple blocks. See the Common Settings: Runner CDN Link documentation for detailed information including when to change versions and URL format.
Model URL
The Model URL setting allows you to load a single 3D model file into your viewer. This is the simplest way to display 3D content on your product page.
Supported Formats
The viewer supports the following 3D model formats:
- GLB / GLTF - Recommended format for web, supports animations and PBR materials
- PLY - Point cloud and mesh format
- SPLAT - Gaussian splatting format for photorealistic captures
- OBJ - Common interchange format
- STL - Simple mesh format, commonly used in 3D printing
Usage
Simply provide a public URL to your model file:
https://example.com/models/my-product.glb
The URL must be publicly accessible. If you're hosting models on Shopify, upload them as assets or use Shopify CDN URLs.
Multiple Models
If you need to load multiple models or have more complex scene requirements, use the Scene JSON Configuration instead. Scene configurations allow you to:
- Load multiple models simultaneously
- Control which models appear based on product variants
- Manage GLTF/GLB node visibility (show/hide specific parts)
- Apply material variants dynamically
- Position and transform each model independently
Alternatively, you can combine multiple models into a single file before uploading.
For products with variants that require showing/hiding different 3D models or parts, the Scene JSON Configuration with variant matching is essential. Configure this using the Viewer Editor.
Note: Variant matching and advanced features availability depends on your subscription plan.
Scene JSON Configuration
Scene JSON Configuration provides advanced control over your 3D scene. You can either provide a JSON configuration directly or a URL to a JSON file.
The easiest way to create scene configurations is using the Viewer Editor - a visual tool that helps you build complex scenes without writing JSON manually. The editor provides a user-friendly interface for all the capabilities described below.
Note: Available features depend on your subscription plan. See subscription plans for details on which features are included in each tier.
What You Can Configure
With Scene JSON Configuration, you can:
- Load multiple 3D models into a single scene with individual positioning
- Control model visibility based on product variants using conditional logic
- Configure advanced backgrounds (gradients, images, HDR skyboxes)
- Set up custom lighting with directional lights and shadows
- Define camera settings including arc rotate camera controls and limits
- Add dimension annotations (linear, angular, radial, diametral, ordinate, bounding box)
- Create points of interest for guided navigation
- Manage GLTF/GLB node visibility based on product variants
- Apply material variants from GLTF files
- Configure animated rotations per model or globally
- Customize loading screens with logos, colors, and progress bars
Scene configurations override individual block settings like Camera Position, Camera Target, and Background Color.
Format
You can provide the configuration in two ways:
1. Inline JSON:
{
  "models": [
    {
      "url": "https://example.com/model1.glb",
      "position": [0, 0, 0],
      "scaling": [1, 1, 1]
    }
  ],
  "arcRotateCamera": {
    "position": [3, 1, 3],
    "target": [0, 0, 0]
  },
  "backgroundColor": "#ffffff"
}
2. URL to JSON file:
https://example.com/scene-config.json
Instead of writing JSON manually, use the Viewer Editor to:
- Import your 3D models
- Configure settings visually
- Export the scene configuration by:
- Clicking the Copy button to copy JSON to clipboard
- Clicking the Download button in the bottom toolbar to save as a file
- Host the downloaded JSON publicly or paste it inline
Features available depend on your subscription plan.
When using a URL, ensure the file:
- Is publicly accessible
- Returns valid JSON
- Has appropriate CORS headers if hosted on a different domain
Automatic URL Detection
The system automatically detects if you're providing a URL (starting with http:// or https://) or inline JSON, so you don't need to specify which format you're using.
- For complex configurations, use a URL to an external JSON file - it keeps your theme settings cleaner and makes updates easier
- Use the Viewer Editor to generate valid configurations
- Test your scene configuration thoroughly before going live
- The scene configuration follows a [JSON schema](https://app-store.bitbybit.dev/files/ecommerce/viewer-editor/viewer-scene-schema-v1.1.0.json) that defines all available options
Camera Position
This is a common setting shared with the RUNNER block. See the Common Settings: Camera Position documentation for detailed information.
For the VIEWER block, the default camera position is [3, 1, 3] - a closer view suitable for pre-made 3D models.
Camera Target
This is a common setting shared with the RUNNER block. See the Common Settings: Camera Target documentation for detailed information.
For the VIEWER block, the default camera target is [0, 0, 0] - looking at the origin where models are typically centered.
Background Color
This is a common setting shared with the RUNNER block. See the Common Settings: Background Color documentation for detailed information.
Show Spinner
This is a common setting shared across multiple blocks. See the Common Settings: Show Spinner documentation for detailed information.
If you're using Scene JSON Configuration, spinner settings defined in the scene config will take precedence over this setting. You can create and manage scene configurations using the Viewer Editor.
Receive Input Names As Variants
This is a common setting shared across multiple blocks. See the Common Settings: Receive Input Names As Variants documentation for detailed information including:
- How input names vs. labels work
- Handling dynamic IDs in input names
- Theme and app update workflow
This setting is crucial when using Scene JSON Configuration with variant-based model visibility or node visibility rules. The Viewer Editor helps you configure these mappings visually.
Input Collection Mode
This is a common setting shared across multiple blocks. See the Common Settings: Input Collection Mode documentation for detailed information including mode options and use cases.
For most VIEWER scenarios, Standard Inputs mode is sufficient. Use All Inputs only if you have custom form fields that control variant visibility in your scene configuration.
Enable Debug Mode
This is a common setting shared across multiple blocks. See the Common Settings: Enable Debug Mode documentation for detailed information including when to use, example output, and usage workflow.
Debug mode is especially useful when setting up variant-based visibility rules in Scene JSON Configuration. It shows you exactly which input names to use in the Viewer Editor.
Try to Prepend
This is a common setting shared across multiple blocks. See the Common Settings: Try to Prepend documentation for detailed information.
Commonly used to position the 3D viewer in the product media gallery alongside or in place of product photos. Combine with Prepend With Query Selector and optionally Remove Children Before Prepend.
Prepend With Query Selector
This is a common setting shared across multiple blocks. See the Common Settings: Prepend With Query Selector documentation for detailed information including:
- What is a query selector
- Default value explanation
- Common selector patterns
- How to find the right selector
- Example selectors for popular themes
Remove Children Before Prepend
This is a common setting shared across multiple blocks. See the Common Settings: Remove Children Before Prepend documentation for detailed information including common use cases and cautions.
Show Fullscreen Button
This is a common setting shared across multiple blocks. See the Common Settings: Show Fullscreen Button documentation for detailed information.
Fullscreen mode is especially valuable for examining 3D models in detail. Keep enabled unless your theme has its own fullscreen implementation.