Interface Overview
The Viewer Editor interface is designed to provide maximum control while keeping essential tools easily accessible. Understanding the layout will help you work efficiently.
Main Layout
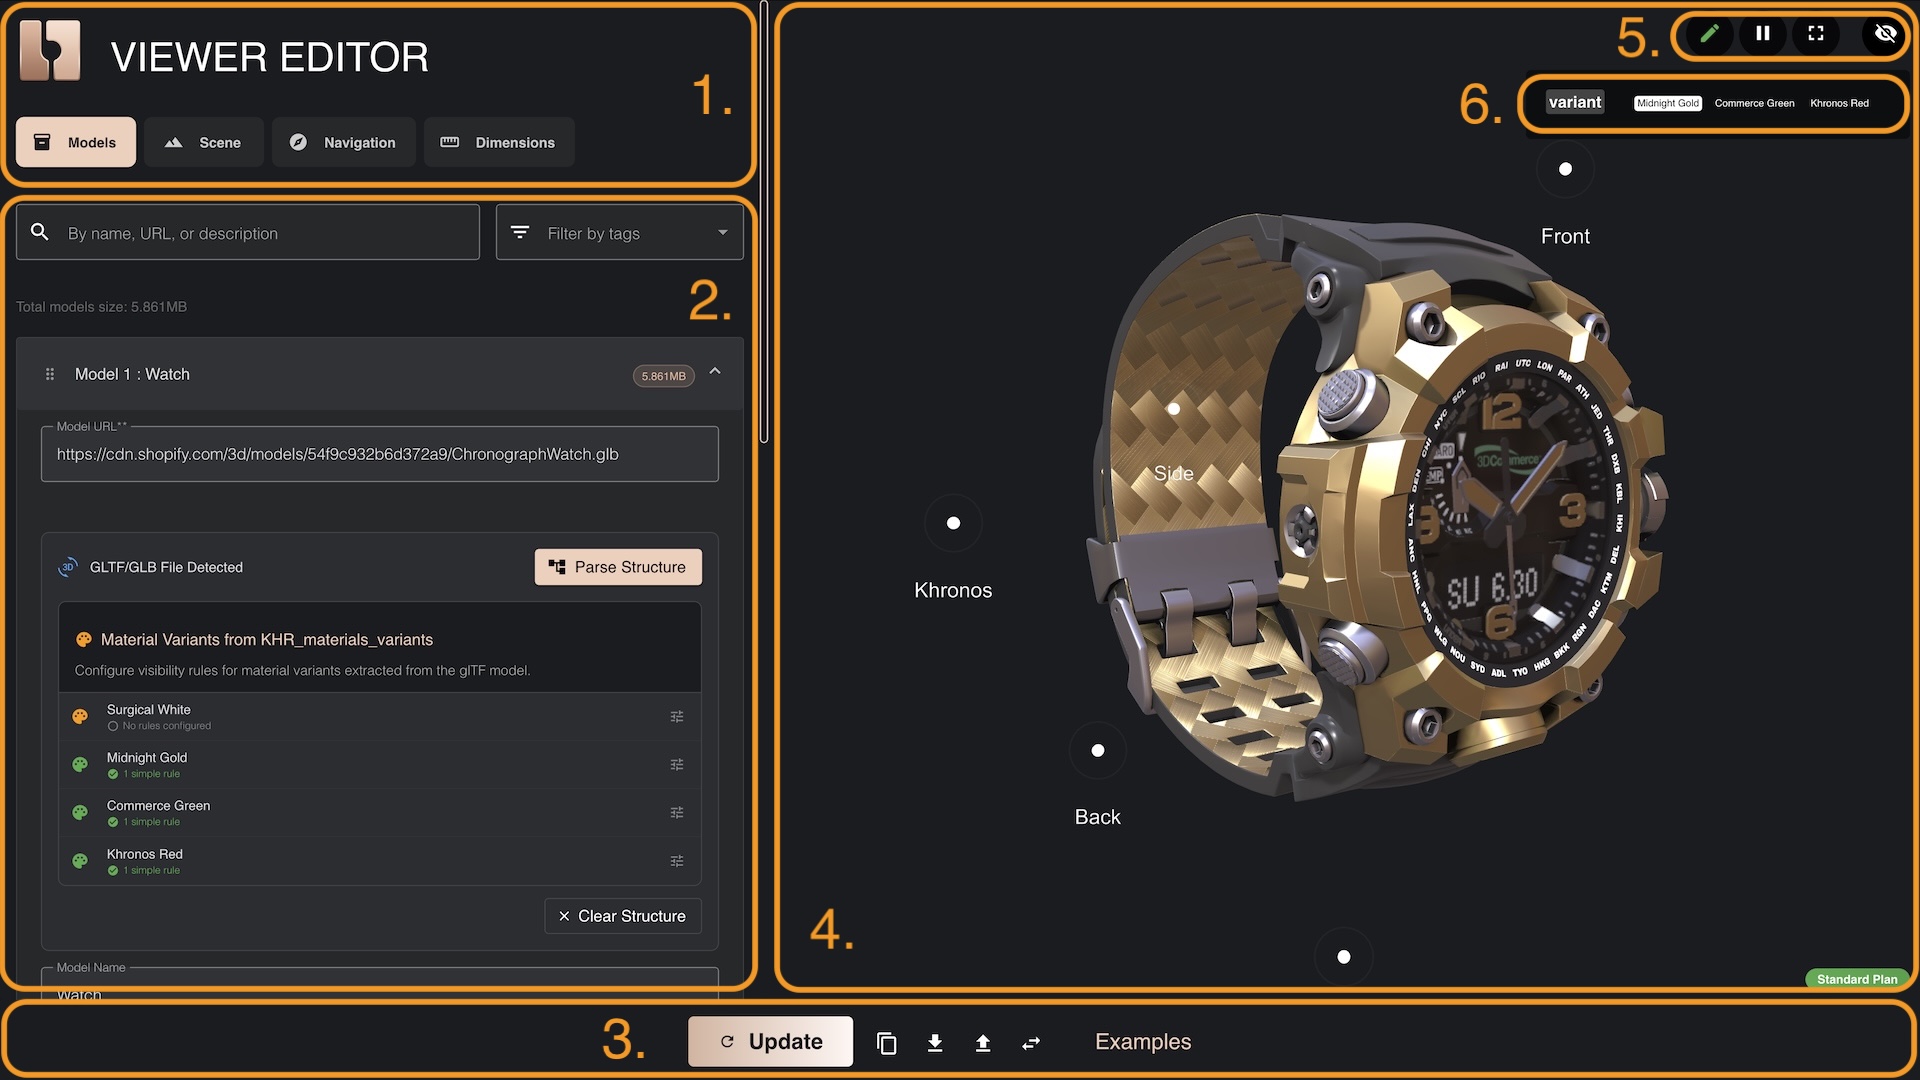
The interface consists of six main areas:
Credits
3D Model: watch 3D asset was started from "Chronograph Watch Mudmaster" by graphiccompressor, licensed under Creative Commons Attribution.
- © 2025, Darmstadt Graphics Group GmbH. CC BY 4.0 International - Eric Chadwick for Model and textures
- © 2015, Khronos Group. Khronos Trademark or Logo - Non-copyrightable logo for Khronos logo
- © 2017, Khronos Group. Khronos Trademark or Logo - Non-copyrightable logo for 3D Commerce logo
- © 2020, Darmstadt Graphics Group GmbH. LicenseRef-LegalMark-DGG - Copyrightable logo for DGG logo
- Navigation Bar - Navigate between models and their settings, scene settings, navgation, dimension and other main entities
- Left Panel - Configure entities, assign variants and scene-level settings
- Bottom Toolbar - Main actions you can do with the project (Download, Upload, Copy, Switch between UI and JSON editors)
- 3D Canvas Viewport - 3D simulator that provides the same experience your users will see on your webshop
- Top Right Toolbar - Batch rename variants, pause rendering of 3D Canvas, show 3D scene in Full Screen, hide variants
- Variant Control Panel - Automatically generated UI containing all options and their values, allowing users to simulate variant switching behaviour
1. Navigation Bar
The top left navigation bar provides menu items that you can activate.
- Models - manage all your 3D models
- Scene - manage scene settings, camera properties, backgrounds, loading indicators, skybox, lighting and shadows
- Navigation - manage points of interest, their styles, and other advanced camera behaviours
- Dimensions - add and manage various dimension entities and their styles
2. Left Panel
When you navigate through menu - this panel changes to expose all of the controls needed to create and administer the entities. If you navigate to Models, you'll be able to create, duplicate and remove 3D assets. If you'll navigate to Scene settings, this panel will show all of the scene settings that you can adjust.
3. Bottom Toolbar
Allows some of the basic editor controls. You can Download project files, open these project files via Upload button, Copy current JSON configuration into clipboard. It also allows you to toggle editor modes between UI and JSON editors.
4. 3D Canvas Viewport
What you see is what you get. Whatever you see in this viewport - you will also see on your product page, except the elements numbered 5 and 6.
5. Top Right Toolbar
These are some common commands that help you batch rename option names and their values. It also can pause rendering of your 3D scene - this is quite useful for heavy scenes, which may make UI editor run slower. You can also enable full-screen mode to better inspec your 3D models. And, of course, you can hide Variant Control Panel when it is not needed.
6. Variant Control Panel
Usually your configurator pages already have HTML forms that our application will be listening to. You will be making sure that input names and their values are synced with option names used in this editor. This toolbar provides automatically assembled option names and their values that you've attached to your 3D models, GLTF material variants or nodes, navigation items or dimensions.
This way you know exactly what options you entered on those entities. It also makes it easier to imitate switching of variants and provides early indication if you made a mistake by naming some variants.
For the best experience, use desktop monitor with Viewer Editor. Mobile devices will provide bad UI experience and will be hard to set up.
Next Steps
Now that you understand the interface layout:
Continue to Adding Models to start building your scene.